TIMSS23 DC Verification - COG FT>DC

Please read these instructions fully before starting the task and get in touch with us if you have any question

What is FT to DC verification?

The TIMSS cognitive materials were already verified in the Field Trial (FT). With the collected data, the Field Trial source has now been edited and ready for the Data Collection (DC). These edits have been reflected to the materials by the national centers. The verifiers will make sure that all the edits that have been done to the target after the field trial is correct and equivalent to the source.

IMPORTANT:

Verification aims for equivalence, which ensures comparability of test results.

Each item should test the same skills and require the same reasoning as the source, while being adapted to the target culture.

What do you need for this verification?

1) Credentials to the system (https://eu.sonet.com.au/) will be in the Dispatch email. Test your credentials and let us know as soon as possible if there is any issue.

2) FT to DC Change list  (download the PDFs below)


Grade 4 source differences 


Grade 8 source differences


3) Differences reports showing the changes in the target version between the FT and DC version (Excel file)- you can download this from the Nexcloud as this one is version specific. (Nextcloud link will be provided in the dispatch email and the password is VerifierDC23) This list does not show the format changes so it is important to to check the PDF files above.

Go to column E. If there is ‘’=’’, it means that the source segment and the target segment have not been changed, so there is nothing to verify.

The sings <>, +-, or-+ mean that the source or target contain some changes. You can filter out all signs ‘’=’’ to go through the segments that were changed but it’s simply nice to have all segments to see the whole context. If the target in column O reflects the target in column N, it means that the source was translated correctly, you even do not need to analyze FT-to-DC change.


In brief,

Columns C and D = Field Trial segments,

Columns H and I = Main Study segments (containing tags and html entities),

Columns N and O = Main Study segments (cleaned from tags and html entities to make it readable).


Please watch this 5 minute video to have a better idea how to check the target and source changes.

https://www.gotostage.com/channel/9f04bf40aa2c4570aaa24d74f14ed8ac/recording/501893aa6cbf42ae86faef20ac9f0fd5/watch


When accessing video tutorials, you will be asked to enter your name and email address.
All video tutorials contain transcripts.

ESSENSE OF THE TASK

For any Assessment materials which were already verified during the FT, the Verifier role will have to:

  • go through the FT to DC changes both in source and in the target one by one checking them vs. the list to make sure that they were all implemented (no reaction required in the system if all is OK, no need to comment).

  • go through the differences reports in Excel-

  • check and react to all National adaptations documented in the system to confirm they were correctly implemented (they have the tag "National adaptation")

  • check linguistic correctness and appropriateness of the edited target, versus the Field Trial verified version or for any new part.

The verifier will go through the edited target version to make sure the changes

  1.  are linguistically correct,
  2.  match the source text (all the information should be there and the difficulty level should be equivalent to source) and
  3.  are consistent with the rest of the materials.

To that end, the verifier will:

  1. compare the edited target to the source in the Assessment Master preview;

  2. in case of issues, correct the target in Assessment Master;

  3. add a comment to explain the issue and choose a severity code. Make sure to link your comment to the appropriate text element!


Commenting

Commenting in TIMSS verification

When you spot an issue to report, please describe what you see (not what should be done), always assigning a severity code and using the standardised comments.

Severity Codes

To help IEA understand the comparability of the translated/adapted text with the international version, you will mark all deviations with a “severity code”. The severity code indicates how you perceive the level of deviation. 

Codes

Explanation

Code 1

The translation contains a severe error that affected the meaning or difficulty of the item

Code 1?

Used whenever in doubt about the severity of an issue or unsure of how to correct a possible error

Code 2

Indicates a minor change or error that did not affect the comprehension

Code 3

Used to suggest an alternative wording for an otherwise appropriate translation


Standardised Comments

Please make sure to use the standardized comments when you report an issue in the target.

There were shared with you while you verified the questionnaires.

Please remember...

👆 Codes 1/1? comments should always go together with a back-translation of the initial target version. Example comment:

Code 1. Mistranlsation. "debate" translated as "fight". Changed by VER.

👉"fight" is the back-translation of the initial target (before your correction)

Step-by-step

NextCloud

In the dispatch mail, you received an NextCloud link. The password is VerifierDC23. You will see the following folders:


From 1_cApStan_to_VER, go to the COG folder and download Style Guide (Excel) where the country's translation team noted the agreed stylistic conventions such as form of address, decimal separators, date/time notations and language variant.

Download the FT to DC changes file file. The list could look long but this could be because of the tag issues. If the target in column O reflects the target in column N, it means that the source was translated correctly, you even do not need to analyze FT-to-DC change.

Please check the PDF files showing the differences that are made to the source version and make sure that these are reflected in the target version.

Log onto Assessment Master (AM)

The verification of the 2021 achievement materials will be performed online for your version, using the Assessment Master (AM) system. This system is designed to work via any compatible operating platform (e.g., Windows, Mac OS, or Linux). However, Google Chrome or Firefox are the preferred Internet browsers for working with this system.

In the dispatch mail, you received a login and password for Assessment Master. On the first screen, select AM Designger:


In the navigation panel (on the left side), select the grade:


NOTE: if your country administers only one grade, you will not see this panel.

When you log in to the SoNet platform, you may need to select the country you are verify for - it is also possible that it is chosen when you log in. If not, click on the country you are verifying for from the list which is on the left side of the screen.

 Everything you are going to verify will be listed on the SoNet Platform. As a default, you will have 15 pages in your screen.

If you would like to see everything in one page, you can select 100 items to be visible in one page (bottom right).

Open an item

To open an item, click Translate button.


Edit translations

To edit a translation, you first need to click on the Edit Translation button with the pencil icon for the selected text element.


This activates the Current Translation box. Once the box opens, you will be able to enter and edit text in this box. The Original text box always shows the international (=source) version of the text for the text element. (It does not mean "previous version".)


After you have made edits, click on  ("Apply") button on the top right corner of the Current Translation box. The colour of the box will turn red:


👆 Edit the translation by deleting the concerned words and/or around them. Do not delete the entire text segment, as there are some html tags that are not visible in the editor box.

Comment

Click on  ("Leave a comment") icon. Enter your comment. Select the comment Type and Severity. Click Add Comment.


After you have clicked Add Comment, you can modify or delete your comment using  buttons. You can click on the text element ID to go to the text element where your comment is linked to.


End your comment with either ‘Changed by VER’ or ‘Unchanged by VER’ (or equivalent expression) to make it clear whether the change was implemented in the target file or not.

💡 Recurring issuemake corrections in all occurrences in the target. In case the issue is repeated within an item, you can comment only once in that item. Comment in the first occurrence and end your comment with "Changed throughout (or Unchanged). Comment not repeated in this item." 

❗ Attention: very often, the comment Type and Severity you have used previously will already be selected. Make sure that you use the correct Severity code.

❗ Attention: always select Translation Verification as comment type, never other types.

In case you see a comment related to layout, or comment type "Layout", a comment from "ISC" (see screenshot below), please disregard it completely. It is not verifier's job to check or comment on layout.


("Verifier" here means "Layout verifier" who works for ISC in Layout Verification.)

Country comments

Verifier must react to the country comments that are related to translation/adaptation issue. Those are labelled as "National Adaptation". To react to a country comment, click "Reply":


In this example, the verifier confirmed that the documented adaptation is implemented in the target. The standard comment to be used in such case is

Adaptation implemented as documented. Requires ISC approval.

DO NOT react to country comments labelled as "layout" or "Internal communication".


Undocumented name adaptation

❓ Q: Names of people adequately adapted to the local context but country did not document about it. What do do?

❗  A: Please enter a comment where you spot this for the first time and stating the following: "Names were adapted to local context and will only be commented on further if there is an issue with the adaptation." After this comment has been added, then you will only need to comment on the adaptation of names if there is an issue (e.g. inconsistency or typo of the adaptation within an item).

Preview

The live preview is always visible on the left-hand side of the translation page. To change what the live preview displays, you can click on the buttons on the top right-hand side of the page.

By clicking on None, the live preview closes and the translation panel fills the page. To re-open the live preview, click on Default (International English version) or your language version.

Publish

When you make a change and apply this, this change will already be visible in the preview. However, it will not be saved in the system if you don't click Publish button. Make sure you click “publish” button to save your changes. When you click the "Publish", a pop-up window will open asking you “Are you sure you want to publish your translations?” Click on “Yes”. The pop-up window will close and the color of the text elements that were red will turn blue. If you click “No”, this cancels the saving of changes and closes the pop-up window. The text elements with unsaved changes will still have a red color.

The Apply button allows you to work in a passage and apply changes to several text elements without saving them every time you make a change to the text. However, we highly recommend saving changes (= clicking on Publish) from time to time to prevent losing the changes you have made.

Before you close the tab, make sure to click the Publish button to ensure that all edits are saved. Note that you can still apply further changes to the text element after clicking the Publish button. "Publish" does not mean that further edits are impossible.

Check your comments

Scroll down to comment pane. Use the scroll bar on the far right (scroll bar 3 in the screenshot below):


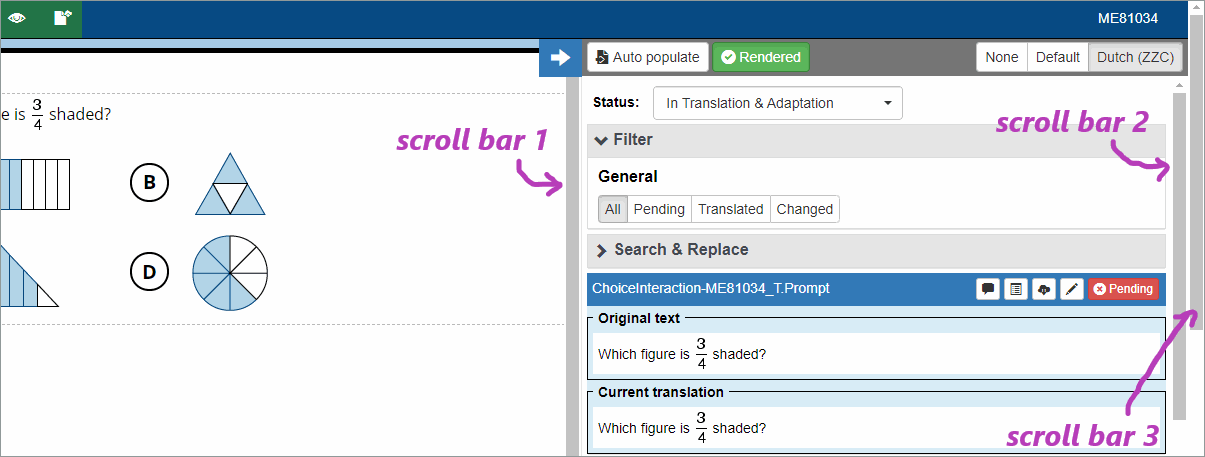
You can filter by comment type or severity. Remove a filter in Text keys to see all comments you made in that item:

  • Make sure every comment is linked to the correct text element

  • Read your comments through once more to make sure they are understandable.

If you would like to make the Assessment Master system more user friendly:


Click on the columns and untick the columns that are called ID, Revision ID, ID Asset, Asset Revision ID, Checked out, Checked Out By etc.


When you unclick them, they will turn grey and will not be visible on the AM system which will give you a better view.
VERIFYING THE DIRECTIONS OR THE PARTS THAT REQUIRE FULL VERIFICATION
The differences reports could not be created for the directions. For this reason they will go through a full verification.
To spot the directions, you can use the filtering option on either Original ID or title column typing "DIR" or the name of the units you have been communicated. (For some countries problem solving items are not Trend)


For English target versions only


If target is in order, you do not need to do anything (no commenting needed).

In case people's names are not adapted and you believe that the person’s names should be adapted to the local context, leave a comment in the items where it is applicable. You do not need to repeat the comment within an item but to leave one comment per item.

Comment:

Code 1? Adaptation issue. Names of people not adapted to local context. Unchanged by VER. Comment not repeated in this item.

Verifier Training

Webinar Recording 

https://attendee.gotowebinar.com/recording/5426848972459685640

Training Slides


Delivery

Make sure you have not forgotten to publish and notify by mail cApStAn project manager at iea.verif@capstan.be. You do not have to change the status of the items.